在 flutter 中利用 source_gen 实现条件编译(中)
在前篇 在 flutter 中利用 source_gen 实现条件编译(上) 中,主要介绍了在 Flutter 跨平台开发过程中“条件编译”特性的需求及现状。本篇将介绍一种利用 Flutter/Dart 官方的代码生成库 —— source_gen 实现条件编译的方法。
从 json_serializable 认识 source_gen
如果是按部就班地学习 flutter,那么应该是在 JSON 和序列化数据 这篇教程里第一次认识 flutter/dart 的
source_gen(代码生成)技术。
json_serializable 做了什么
在网络应用开发中,经常需要做 JSON 对象的序列化和反序列化。如果直接使用 dart:convert 包将json字符串反序列化,得到的将是一个通用的Map/List结构,然后开发时通过输入字段名字符串的方式从中取值,非常的不方便,所以在前后端已经定义好数据格式时,通过预定义实体类,json解析后将字段值映射到这个实体类的属性上,就可以在开发时获得类型提醒和约束,从而极大提高开发效率,并降低出错的概率。而json_serializable就是flutter/dart官方推荐的用于生成实体类的工具:
Automatically generate code for converting to and from JSON by annotating Dart classes.
使用步骤
向项目的
pubspec.yaml添加依赖1
2
3
4
5
6
7
8dependencies:
# Your other regular dependencies here
json_annotation: <latest_version>
dev_dependencies:
# Your other dev_dependencies here
build_runner: <latest_version>
json_serializable: <latest_version>以 json_serializable 的方式创建模型类,例如:
1
2
3
4
5
6
7
8
9
10
11
12
13
14
15import 'package:json_annotation/json_annotation.dart';
part 'user.g.dart';
()
class User {
User(this.name, this.email);
String name;
String email;
factory User.fromJson(Map<String, dynamic> json) => _$UserFromJson(json);
Map<String, dynamic> toJson() => _$UserToJson(this);
}运行命令生成代码
1
flutter pub run build_runner build --delete-conflicting-outputs
流程分析
通过分析上面的步骤以及json_serializable的源码我们可以得知:
- json_serializable的代码生成依赖的是名为build_runner的开发库
- 通过输入的代码以及注解添加的信息(或者说元数据metadata),经过编写的builder处理即可生成所需的代码
- 使用source_gen可以简化builder的创建
所以现在,我们可以确定可以通过以下思路来利用代码生成来实现条件编译:
- 先将所有平台所需的代码写进源代码,并根据代码运行的平台(编译条件)添加注解
- 基于source_gen编写
Generator和Builder,利用build_runner为指定平台生成新的dart源文件 - 在其他源文件中import新生成的dart源文件,从而实现条件编译
- 之后想要为其他平台编译代码时,只要用新的平台变量再次运行build_runner即可。
DEMO
基于上述思路,实现了如下demo项目:
https://github.com/debuggerx01/flutter_platform_code_demo
主要实现参考了:https://github.com/dart-lang/source_gen/tree/master/example_usage
源码说明
- 先定义注解
lib/builder/platform_annotation.dart:1
2
3
4
5
6
7
8
9
10
11
12
13
14
15
16
17
18
19
20
21/// 本DEMO假设只有两个平台(编译条件),即移动端和桌面端
enum PlatformType {
mobile,
desktop,
}
/// 该注解用于标记一个源文件需要被处理,使用时需要放在想要处理的源码的第一行
class PlatformDetector {
const PlatformDetector();
}
/// 用于标记某个语法元素需要在什么平台上保留,并可以指定保留时其名称的重命名
class PlatformSpec {
final PlatformType platformType;
final String? renameTo;
const PlatformSpec({
required this.platformType,
this.renameTo,
});
}
编写
Builder,也就是代码处理逻辑的入口(lib/builder/platform_builder.dart):1
2
3
4
5
6
7
8
9
10
11
12
13import 'package:build/build.dart';
import 'package:source_gen/source_gen.dart';
import 'platform_annotation.dart';
import 'platform_generator.dart';
Builder platformBuilder(BuilderOptions options) => LibraryBuilder(
PlatformGenerator(
/// 这里读取指定的平台是什么,可以通过编辑 build.yaml,或者执行 build_runner build命令时通过参数传入
PlatformType.values.byName(options.config['platform']),
),
/// 这里指定了生成的代码的后缀名
generatedExtension: '.p.dart');编写
Generator,也就是代码处理的逻辑(lib/builder/platform_generator.dart):
https://github.com/debuggerx01/flutter_platform_code_demo/blob/main/lib/builder/platform_generator.dart处理逻辑为:
- 对于每一个被
PlatformDetector注解标记的源文件,读取其源码,然后递归遍历所有语法元素 - 如果该语法元素被
PlatformSpec注解标记,判断其platformType是否和当前指定的平台匹配- 如果匹配,则将该语法元素重命名(如果需要)后存入
_renames集合,其中key是原始的源码字符串,value是重命名后的源码字符串 - 如果不匹配,则将该语法元素存入
_removes集合
- 如果匹配,则将该语法元素重命名(如果需要)后存入
- 遍历完源码后,先利用
_removes集合,将源码中不符合指定平台的代码元素移除 - 再利用
_renames集合,将源码中需要保留和重命名的代码元素进行替换
- 对于每一个被
根据文档,在项目根目录添加
build.yaml用于build_runner的执行:1
2
3
4
5
6
7
8
9
10
11
12
13
14builders:
platform_builder:
import: 'lib/builder/platform_builder.dart'
builder_factories:
- platformBuilder
build_extensions: { '.dart': [ '.p.dart' ] }
auto_apply: root_package
build_to: source
defaults:
generate_for:
include:
- lib/**
options:
  platform: desktop
使用方法
方法一
- 修改
build.yaml,修改最后一行platform:的值:1
2options:
platform: desktop当前可选
mobile和desktop - 运行代码生成:
1
flutter pub run build_runner build --delete-conflicting-outputs
方法二
直接在代码生成命令中加入options覆盖参数:
- desktop:
1
flutter pub run build_runner build --delete-conflicting-outputs --define "flutter_platform_code_demo:platform_builder=platform=desktop"
- mobile:
1
flutter pub run build_runner build --delete-conflicting-outputs --define "flutter_platform_code_demo:platform_builder=platform=mobile"
举例
源代码test.dart:
1 | () |
在指定PlatformType为mobile时将生成如下test.p.dart代码:
1 | // GENERATED CODE - DO NOT MODIFY BY HAND |
在指定PlatformType为desktop时将生成如下test.p.dart代码:
1 | // GENERATED CODE - DO NOT MODIFY BY HAND |
说明
当前支持替换的语法元素
- 类定义(ClassDeclaration)
- 变量定义(VariableDeclaration)
- 顶层变量定义(TopLevelVariableDeclaration)
- 字段定义(FieldDeclaration)
- import指令(ImportDirective)
- 函数定义(FunctionDeclaration)
- 方法定义(MethodDeclaration)
更多语法支持可以通过在
lib/builder/platform_generator.dart中增加visitXXX系列的方法覆写来实现。
调试开发的方法
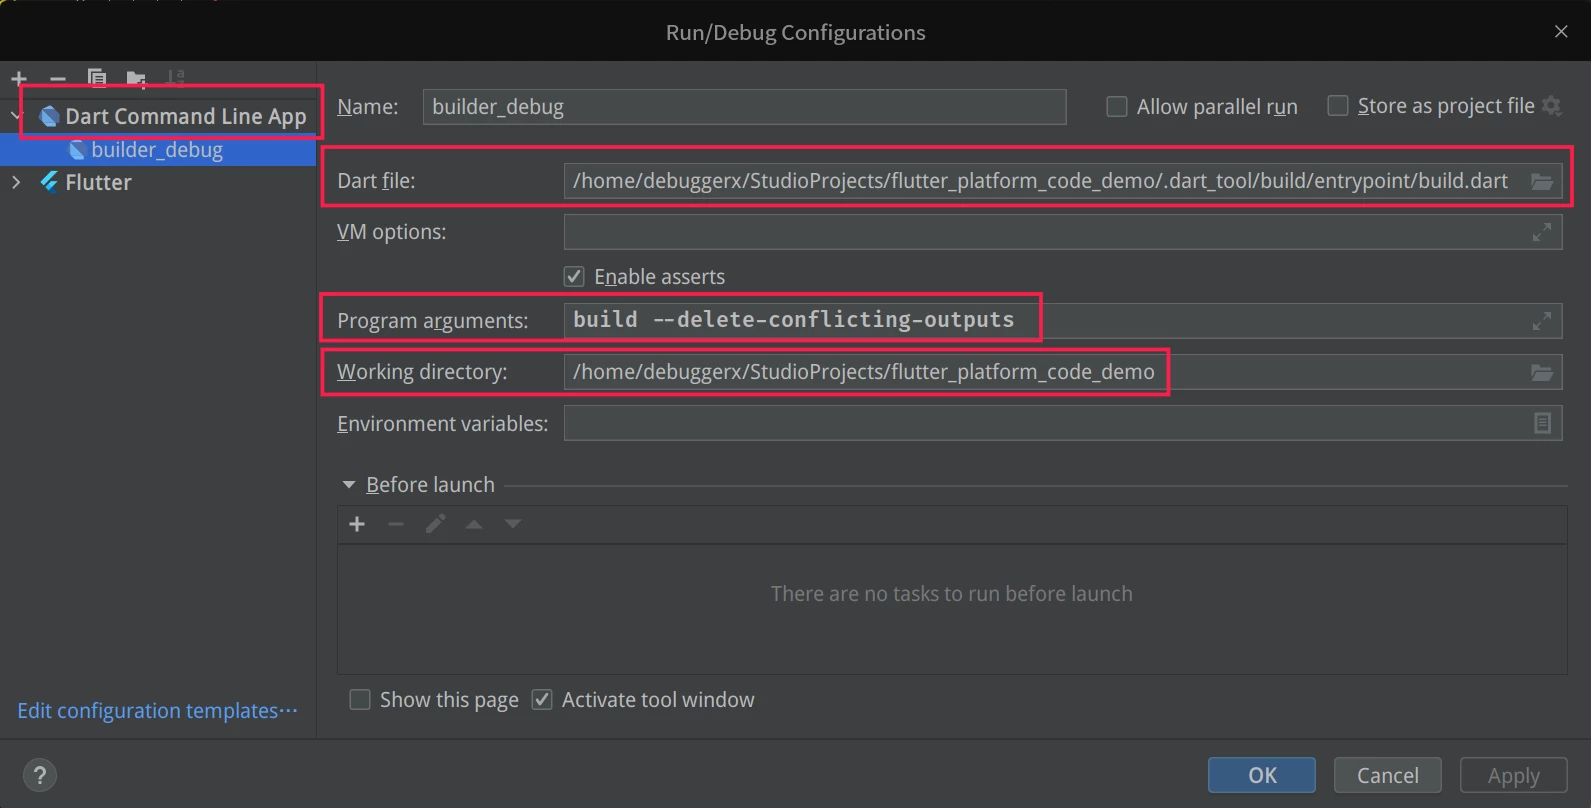
参考 https://github.com/dart-lang/build/tree/master/build_runner#legacy-usage ,当想要自定义代码生成逻辑时,可以在IDE中运行 .dart_tool/build/entrypoint/build.dart 来进行调试,该文件会在项目安装依赖后生成。
以 Android Studio 中的配置为例:
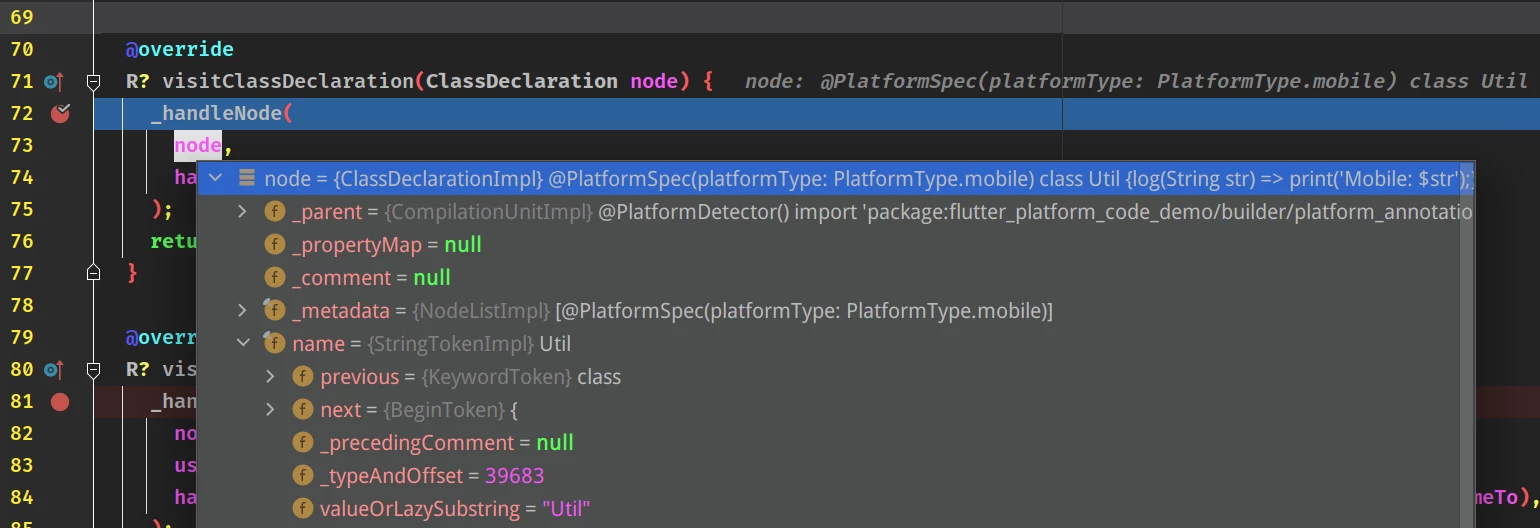
然后即可在 lib/builder/platform_generator.dart 的 visitXXX 系列方法上打断点进行调试:
以上面的方式已经可以满足简单的条件编译需求,这种实现方式与前文中提到基于操作注释的方式有相似之处,优点是出错的概率相对比较低,编写过程中可以获得更多的IDE提示支持,阅读源码时也可以正常获得代码高亮。在下一篇文章中,将继续介绍如何应对一些更复杂的情况。


